PrintUI offers a few different ways of controlling resolution of linked images. The options differ slightly and it is not always obvious how they interact. Here I will try to explain it in detail.
A bit of history:
Among the first features we introduced to PrintUI was the ability to preflight images. Preflighting is done by InDesign Server at upload time. The server checks that an image meets a designer-defined minimum resolution requirement at a predefined target size. These values are defined in the PrintUI Management plugin on a template-by-template basis. Once the image passes the preflight, it is added to the page with no constraints on how it could be resized on the page.
This was not enough control for many clients, and later we added the ability to control images from resizing to lower than a predefined resolution after upload. The images are constrained in the web app to not be resizeable to a size too large for the resolution constraints.
Controlling the options:
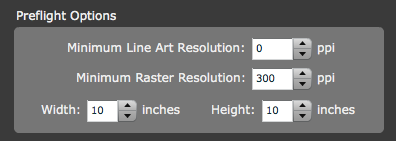
The preflight controls and the resize controls are really two separate features and you can use one without the other, but the controls do overlap. To set the preflight options, you must use the Management plugin and it is set on a template by template basis. For the preflighting of uploaded images to be done, you must set both a ppi value, and a width and height. If any of those values are 0, InDesign Server will not preflight images and all images can be added to the page. In other words, if you specify a ppi of 300, but no width and height, no preflighting will be done.
The resize control is different on two counts. First of all, it can be controlled at run-time using two Flashvars: limitImageResize and imagePpiLimit. limitImageResize is a switch which turns the resize limit on or off (it takes true or false values). If limitImageResize is set to false, the images will be allowed to resize freely no matter what other settings are applied either in the template or Flashvars.
If limitImageResize is set to true (the default), then images will have their size constrained to the set ppi value. Currently, that value can be set in two ways. If there’s no value set (or it’s set to 0), images can be resized freely. The first way to set the limit is at runtime using the imagePpiLimit Flashvar. However, there’s second way to specify the ppi — using the Preflight Options in the Management plugin, which brings us to the second difference alluded to above.
If there is a ppi value set in the preflight options and there is no value set for the imagePpiLimit (i.e. imagePpiLimit takes precedence over the preflight value), then that value will be used to constrain the image resizing. It’s important to note, that the width and height values have no meaning in regard to constraining the image resize. That is only for the preflight controls.
The take-away from all of this is as follows:
- If you want to only preflight for image resolution, but not constrain the resizing, do the following: Set the Preflight Options including width and height values, and use the limitImageResize Flashvar, setting it to false.
- If you want to both preflight and constrain image resizing to the preflight value, set the preflight values including the width and height, and leave the limitImageResize Flashvar alone.
- If you want to only constrain the resizing without preflight and set this on a template-by-template basis, set a ppi value in the Preflight Options, but leave the width and height values at 0.
- If you want to control the resizing at runtime, use the imagePpiLimit Flashvar setting it to your minimum ppi.
I hope this helps clear up some confusion on these features. Happy PrintUIing! 🙂